Analyzing a video
A video analysis goes through four steps, shown in the step bar at the top of each screen: Start → Set up → Preview → Result. The bar at the bottom always offers the previous and the next step, such as ‹ Start and Generate Preview ›.
Start: choose assay and video
On the Experiment tab, the New experiment card holds the assay picker and the video buttons. The video buttons appear only for assays that support video.
- Analyze Video from Photos opens the system photo picker. RodentFlow receives only the video you pick and does not need access to your photo library.
- Choose Video from Files accepts videos from On My iPhone, iCloud Drive, network shares and USB drives.
The app keeps its own working copy of the video while the analysis is open. Your original is not changed. Closing the video with Close Video removes the working copy, and saved results are kept.
Going back to the start screen does not close the video. An Open video card shows it, with Open Result (once a result exists) and Close Video. To continue where you left off, use the bottom bar or the step bar.
Set up
The setup screen is a single page with six cards. The menu at the top jumps to each one.
Video
Source, file name, duration, resolution, frame rate and creation date, read from the file. Nothing to enter.
Experiment
| Field | Notes |
|---|---|
| Mouse ID | The animal's identifier, e.g. C01. Results of the same animal are averaged together in the Groups tab, so use the same ID across sessions. |
| Group | e.g. WT, KO, Vehicle. Spelling must match across animals; WT and wt are different groups. |
| Sex | Male, female or blank. |
| Phase | For assays with fixed phases, a picker: Training/Test (NOR), Acquisition/Probe (water maze, Barnes), Training/Context test/Cue test (fear), Pre-test/Conditioning/Test (CPP). For other assays, free text. |
| Day, Trial | Shown for assays that use them, such as day for learning curves and trial within a day. |
| Experiment date | Taken from the video's creation date when the file has one. Date source tells you where it came from: video metadata, entered by you, or the import time as a fallback. |
Assay & arena
The assay can still be changed here. The arena shape and its real dimensions in centimeters come next.
| Shape | Used by | Dimensions to enter |
|---|---|---|
| Rectangle | Open field, light–dark box, CPP, NOR, fear conditioning | Width, Height of the inner floor |
| Circle | Open field, NOR, water maze, Barnes maze | Diameter of the inner floor or pool |
| Plus maze | Elevated plus maze | Arm length (excluding center), Arm width |
| Y-maze | Y-maze | Arm length, Arm width |
| T-maze | T-maze | Start arm length, Choice arm length (each side), Arm width |
Measure the surface the animal walks on, inside the walls. The calibration handles go on the same boundary.
Analysis settings
Tap Show settings for … to see the zones and thresholds of the assay, such as center size, open-arm axis, light compartment, object radius, platform radius or freezing threshold. They are applied after tracking, so they can be left at their defaults now and changed later on the result screen without re-analyzing. Each assay page lists the settings and their defaults: anxiety, memory, reward.
10-second preview
Choose which 10 seconds the preview tracks. Use the Start slider, Use this frame (the frame shown in the calibration card), or Random 10s. Pick a stretch where the animal moves through the arena. The preview is only a visual check. The full analysis always reads the whole video.
Calibration
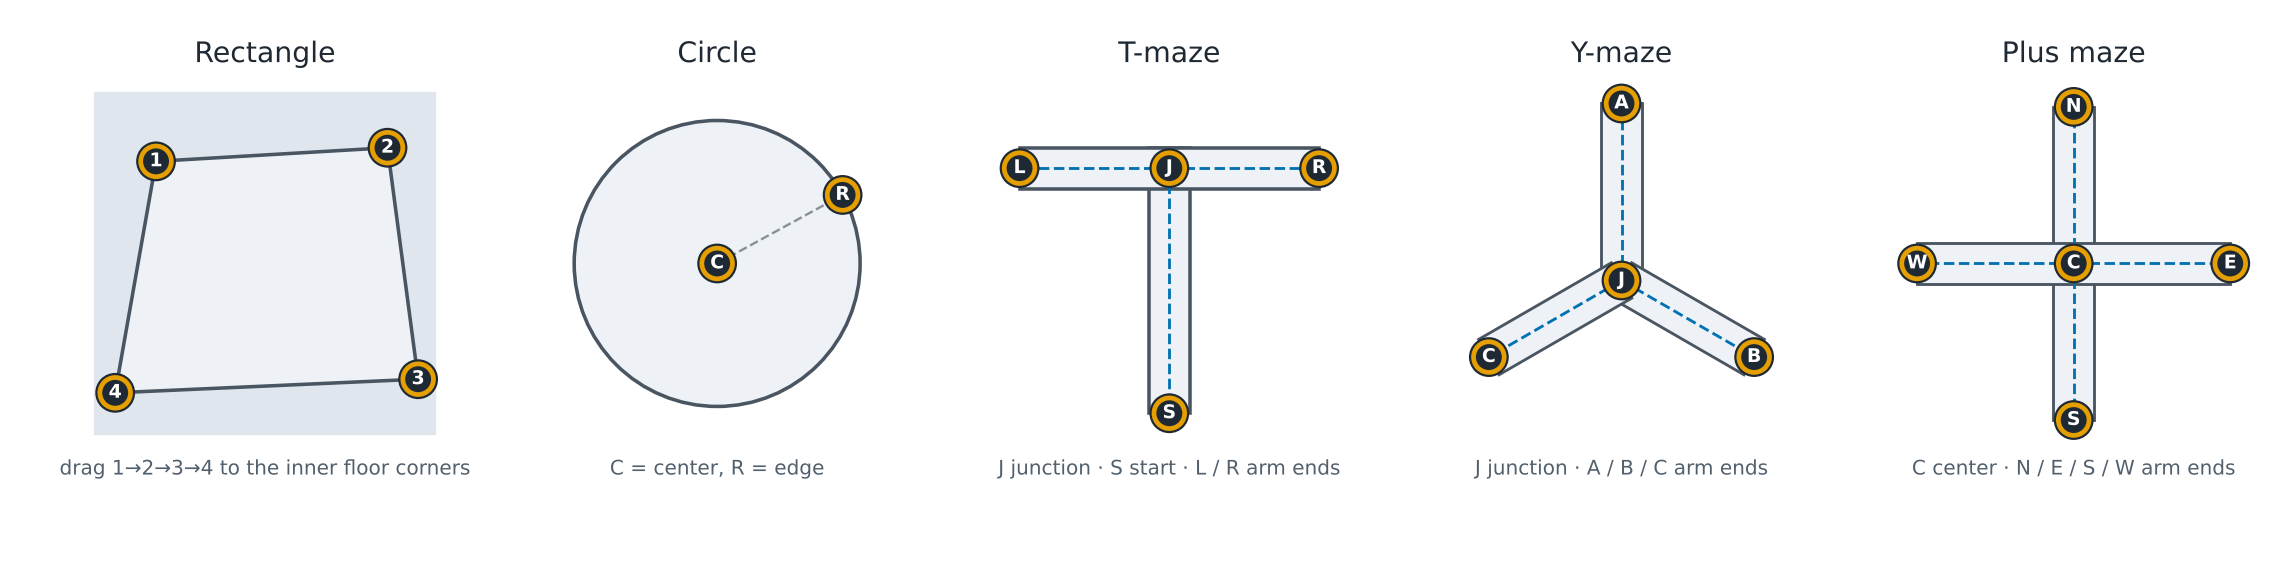
Calibration tells the app where the arena is in the picture. Drag each handle onto its point in the frame. Reset puts the handles back to their default positions.
| Shape | Handles |
|---|---|
| Rectangle | 1 → 2 → 3 → 4 around the inner floor boundary, in order. Coordinates are perspective-corrected, so a slightly oblique camera is fine. |
| Circle | C on the center, R on the inner wall. Use a camera that is directly above. |
| T-maze | J on the junction, S at the end of the start arm, L and R at the ends of the two choice arms. |
| Y-maze | J on the center junction, A, B, C at the three arm ends. |
| Plus maze | C on the maze center, N, E, S, W at the arm ends. N is the top of the image. Which pair is open is chosen in the analysis settings. |
Some assays need extra markers in the same view:
- Novel object recognition: drag A and B onto the centers of the two objects. Choose which one is novel in the analysis settings.
- Morris water maze: drag P onto the platform center. Mark it from an acquisition video if the platform is not visible in the probe.
- Barnes maze: drag T onto the target (escape) hole. The other holes are placed evenly around the same ring.
The zones drawn on the calibration image, such as the center square, arms and chambers, are a quick visual check that the dimensions and handles agree.
Same setup as the previous video?
After Next Animal, if the new video has the same assay and resolution as the previous one, a banner offers Use Previous Setup. It copies the arena size, calibration and analysis settings. If the camera might have moved, check the handles afterwards.
Preview
Generate Preview › tracks the chosen 10 seconds and plays them back with the tracked point and the arena outline drawn on the video. The preview and the full analysis use exactly the same tracker at 10 samples per second.
The Quality check card lists what to look for:
- the dot follows the mouse consistently;
- the trail does not jump to shadows, reflections or the arena wall;
- the rectangle, circle or maze centerlines match the floor;
- in mazes, the zone label changes correctly as the mouse enters each arm.
If something is wrong, go back with ‹ Setup, adjust, and tap Update Preview. If you change the setup after a preview, the app reminds you to update the preview before the full analysis. FAQ & troubleshooting lists the common causes of a bad preview.
Full analysis
Analyze Full Video reads the complete recording from start to finish at 10 samples per second. The progress card shows percent done, samples processed, elapsed time and an estimate of the time left.
- Pause & Save stops and keeps everything analyzed so far. Resume Analysis continues from there, and Start Over discards the partial run.
- A checkpoint is saved about every 30 seconds of work. Leaving the app pauses and saves automatically, because iOS does not allow long video processing in the background.
- If the app was closed during an analysis, the start screen shows Unfinished analysis found, with Resume Analysis and Delete.
- While a full analysis is running, a new video cannot be chosen. Pause it first, or wait until it finishes.
When the analysis finishes
- The result is computed and saved immediately. For T- and Y-mazes, a Maze readout shows the arm sequence.
- Open Result shows the result screen.
- Compare in Groups opens the Groups tab on this assay.
- Next Animal closes this video and returns to the start screen, keeping the assay, group, phase and day for the next video.
The raw tracking data are saved automatically to a run folder at Files › On My iPhone › RodentFlow › Experiments › … (see Files & data). Share Run Folder sends the whole folder, and the buttons below it send single JSON files: full tracking, summary, metadata, 10 s preview, and maze events for mazes.
Scoring a batch of animals
- Record all animals with the same camera position.
- Analyze the first video completely and check its result.
- For each further video: Next Animal, choose the video, change Mouse ID and Group, then Use Previous Setup, Generate Preview, a quick look, and Analyze Full Video.
- Open the Groups tab when all animals are done.
Tracking runs without a result
Run folders saved by RodentFlow 1.0, and run folders whose result was deleted, contain positions but no result. When such folders exist, the start screen shows N earlier tracking run(s) without results with a Create Results button. It computes results from the saved positions with the current metrics, without opening the videos again. Zone settings start from their defaults. For object recognition, the water maze and the Barnes maze, check the markers on the new results.